Simplify Your Home in 4 Steps
Your home needs to breathe. A cluttered home tends to make us feel overcrowded and unable to fully relax. By simplifying your home, you allow the space to create its own natural calm.
This is what I want for you and your home. In this post, I will go over how to create a relaxed space while still keeping your unique style in mind. I will focus on how to clear your home, room by room, of unnecessary clutter. Then I will share how to reintroduce what belongs in that space. Lastly, I’ll discuss how to add new items without overcrowding the area. Say goodbye to excess stuff, and hello to a stress-free home!
The 4 Steps to Simplify Your Home:
- Clean the Room
- Clear the Room
- Re-evaluate the Room
- Recreate the Room
One Room at a Time
Trying to simplify your home in one fail swoop would be quite the task. Most likely it would lead to one being exhausted and overwhelmed. So, we will take it step by step, starting in a single room. Once that room is complete, you can revisit these steps in the next room, until you have simplified the entire house.
I recommend starting in the main room you use for relaxation. This is often your living room or master bedroom. I personally prefer to start with the living room since it is often the heart of the home, where everyone unwinds from the day.

Step 1: Clean the Room
A simple but necessary step. In order to see what you need to do to any given room; you first have to clean it. Clean, organize and remove whatever does not belong in this space. You can find more on cleaning routines here.
Step 2: Clear the Room
Now that you have only the things you wish to keep in this room, temporarily remove everything that is an accent piece. This means any knick -knacks or décor items. Remove the pillows, lamps, rugs, plants, ottomans, and whatever items add to the room itself. Everything but the main pieces of the furniture, such as the couch, coffee table, and chairs, should go into another room for a short time.
Step 3: Re-evaluate the Room
Take a look at your space. It is now cleared of all the little things that distract you from the room itself. Now, look at your furniture. Do you like how it is set up? Is there a better way of arranging that will make the room more practical for its intended daily use? Are you tired of the layout? This is the time to do some rearranging and reassessing of your room. Make your ideal layout come to life!
After your furniture is in place, take in this new layout. It may take a bit to adjust to so feel free to sit on it for a day or two and make sure you like it. It will feel incomplete without the pieces that add to it, but you should be able to get a feel for the room itself.
Find What's Missing
Sit in your décor-less room for a bit. Look around. What seems to be missing? Think about the small touches you can add without overwhelming the space. You have a fresh slate now so don’t rush to bring everything right back in! This is the perfect time to assess how you can keep the layout simple while still making it feel complete.
Write down a list of items you feel the room could use (this can be a mix of items you have and items you still need to get). These will be the main elements to complete the room. For example, when I reevaluated my living room, I felt it needed a lamp, some pillows, a throw, ottomans, and a decorative tray.

Step 4: Recreate the Room
Now is the time to bring things back into the room, one at a time. Items that are a perfect fit for the room can stay. Those that are not should be removed from the room before assessing the next item. This way, you won’t have something that does not fit in the room negatively affecting what might be a perfect match for the space.
Go through each of these items, in turn, analyzing each one. Let us return to my living room example. We will start with the lamp. Ask yourself: Is the lamp you have a good fit for the space? Maybe your lamp looks dull and doesn’t match the style of the room. Can you repaint it or get a new lampshade to make it look at home in the space? Or does it need to be replaced? Perhaps you need one more practical for the room, such as a floor lamp instead of a table lamp.
Piece by Piece
Let’s start off with an example. For me, I feel that our current lamp is adequate enough, but it needs a makeover. The soft brass color would be much better if painted white, and the lampshade is too small and dark for the room. So, making over the lamp is now on my to-do list. I remove it from the room.
I do the same with my pillows. They are decently new and the perfect match for the room. They can stay. My throw compliments the couch and pillows, so it too stays. The tray is removed because the style does not fit the look I am going for. A new tray is added to the shopping list along with new decorative pieces to go on it.
The ottomans need a makeover but they do match (even with the coffee stains). Since we use them as a makeshift coffee table and keep them covered with a large serving tray, they are good enough to remain without throwing off the room (until the right fabric is found). They will stay.
Do this same exercise for your room. Be sure to note what still needs to be purchased or replaced (including any supplies needed to restore a piece), introducing them into the room after they are found.
If possible, leave the items that do not fit into the space out of the room until it is replaced or refinished. This makes any do-it-later project move up to a must-do project. You are more likely to finish something if you don’t have it there to serve you, and this way you don’t push it off to “someday”. It’s a great motivator!
Unused Items
A note about the items that didn’t make the cut. I would recommend holding onto them for now. If the piece is not a good fit for this particular room, it could be perfect for another room in your house. Hold onto it until your entire home has gone through this simplification process. Then, if it still does not belong, it’s time to get rid of it.
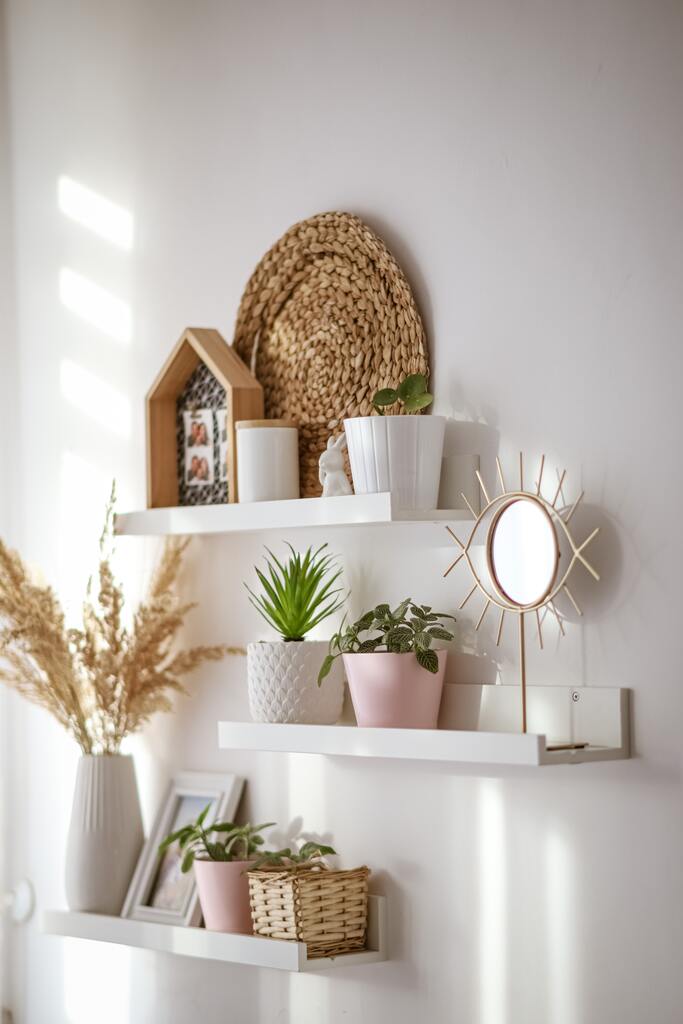
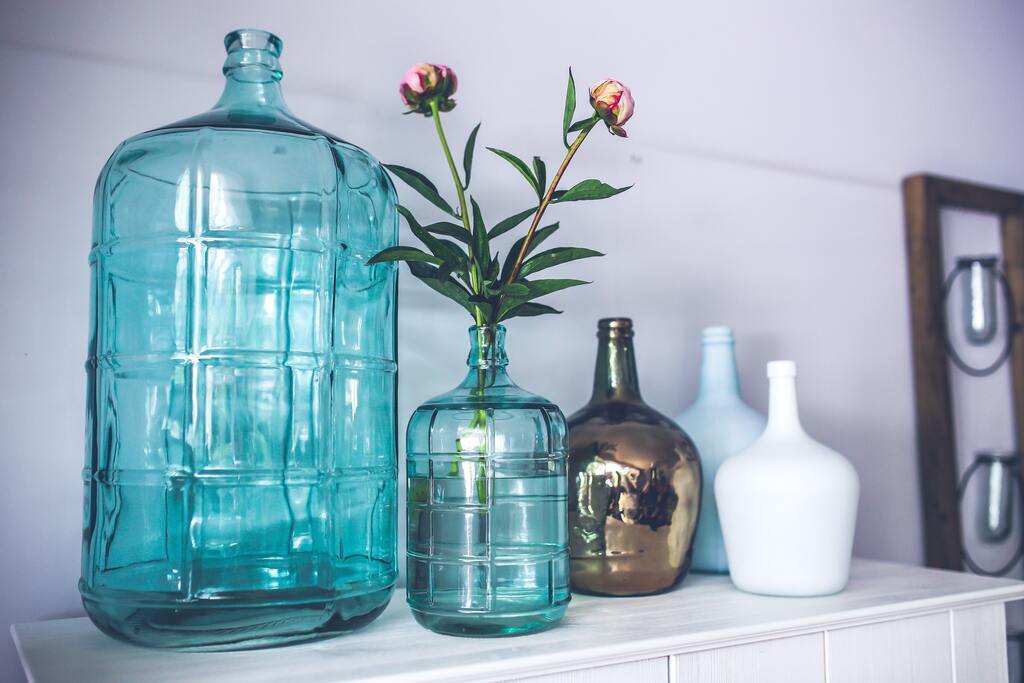
All the Small Things
This is the most important step. Now that you have your bigger décor items in place, we can move on to the rest. The little things are the ones that crowd a room the most, so be careful here. The intent is to cut down on the clutter, not reintroduce it. Keep it simple, neat, and clean.
If you have a shelf that you had previously packed every inch of with little knick-knacks, for example, stop and reconsider. Your room needs space to breathe. These shelves should have simple, almost minimal décor on them. Enough so they don’t look empty, but not so much that it begins to look cluttered. It’s not an easy balancing act, but it’s a necessary one.
Start by putting a few items up at a time. Perhaps a vase, a picture frame, and a small potted plant. How does it look with just a few pieces? Switch out what doesn’t fit and add more when it seems too empty. Once it starts looking busy, take some elements back out.
You should be able to look at the shelf with a sense of calm. It should be relaxing yet pleasing to the eyes. If you automatically start thinking about how there’s so much to dust, then it’s too busy. Simplify it back down. Shelves are a more extreme example, but you should be able to do this with everything in your home.
Flat surfaces have a tendency to collect things, so be sure to keep items to a minimum and only allow things that add to the room itself. Our tray on the ottomans houses a vase with preserved greenery and a few stacked books. Just enough to not have an empty tray, but not enough to bring any sense of overwhelm to the room. Try creating focal points to help you focus your décor without overdoing it.
The Completed Look of a Simplified Home
Time for that sign of relief, you’re all finished! The intent of simplifying your home is to make sure that each room in your house only has things that are practical or pleasing. You should not be walking into a busy room, one that has too much stuff overcrowding it. Your home is meant to relax you. Be sure that whatever you keep in each room creates a calming home environment. And don’t forget to let your home breathe.